These materials are for informational purposes only and do not constitute legal advice. You should contact an attorney to obtain advice with respect to the development of a research app and any applicable laws.
Creating Surveys
A survey is a sequence of questions that you use to collect data from your users. In a ResearchKit app, a survey is composed of a survey task that has a collection of step objects (ORKStep). Each step object handles a specific question in the survey, such as “What medications are you taking?” or “How many hours did you sleep last night?”.
You can collect results for the individual steps or for the task as a whole. There are two types of survey tasks: an ordered task (ORKOrderedTask) and a navigable ordered task (ORKNavigableOrderedTask).
In an ordered task, the order that the steps appear are always the same.

In a navigable ordered task, the order of the tasks can change, or branch out, depending on how the user answered a question in a previous task.
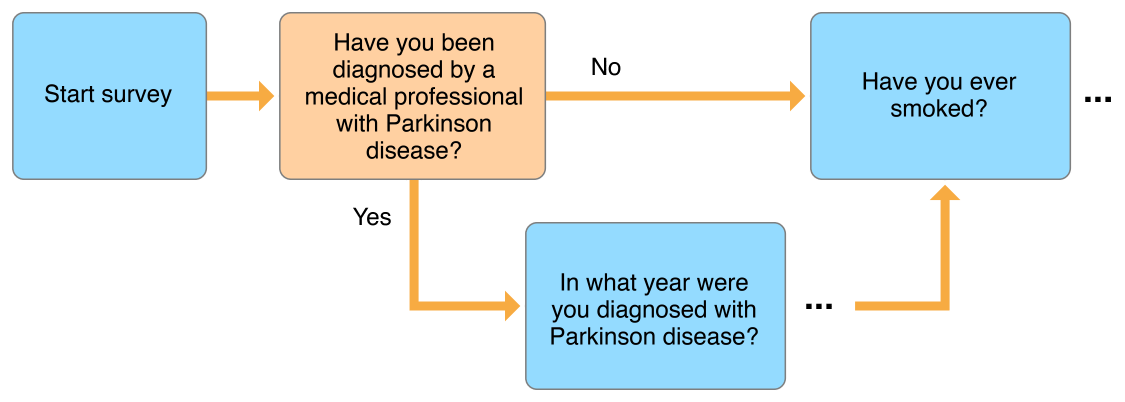
The steps for creating a task to present a survey are:
1. Create Steps
The survey module provides a single-question step (ORKQuestionStep)
and a form step that can contain more than one item
(ORKFormStep). You can also use an instruction step
(ORKInstructionStep) or a video instruction step (ORKVideoInstructionStep) to introduce the survey or provide instructions.
Every step has its own step view controller that defines the UI
presentation for that type of step. A task view controller presents the steps, instantiating and presenting the right step view
controller for the step. You can optionally customize the details of
each step view controller, such as button titles and appearance, by
implementing task view controller delegate methods (see
ORKTaskViewControllerDelegate).
Instruction Step
An instruction step explains the purpose of a task and provides
instructions for the user. An ORKInstructionStep object includes an
identifier, title, text, detail text, and an image. An
instruction step does not collect any data and yields an empty
ORKStepResult that nonetheless records how long the instruction was
on screen.
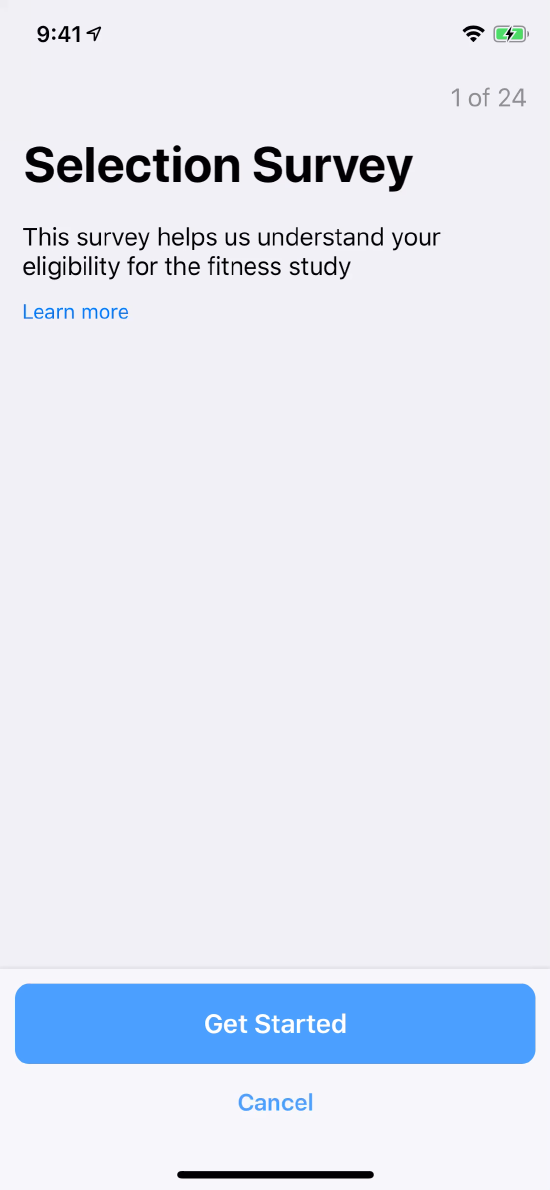
    ORKInstructionStep *step =
      [[ORKInstructionStep alloc] initWithIdentifier:@"identifier"];
    step.title = @"Selection Survey";
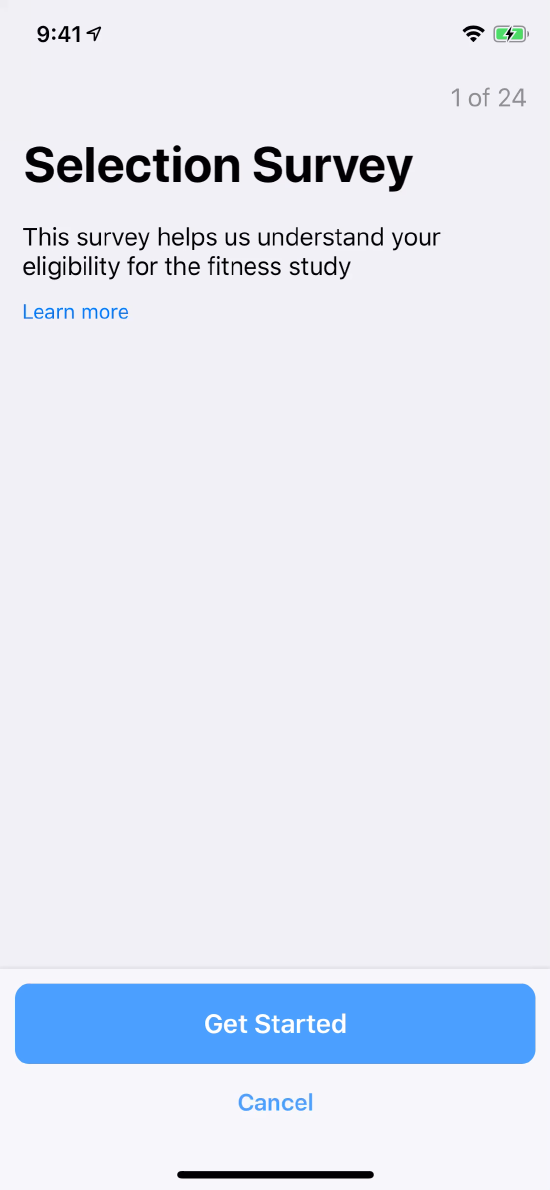
    step.text = @"This survey helps us understand your eligibility for the fitness study";
Creating a step as shown in the code above, including it in a task, and presenting with a task view controller, yields something like this:
Question Step
A question step (ORKQuestionStep) presents a single question, composed of a short title and longer, more descriptive text. Configure the type of data the user can enter by setting the answer format. You can also provide an option for the user to skip the question with the step’s optional property.
For numeric and text answer formats, the question step’s placeholder property specifies a short hint that describes the expected value of an input field.
A question step yields a step result that, like the instruction step’s result, indicates how long the user had the question on screen. It also has a child, an ORKQuestionResult subclass that reports the user’s answer.
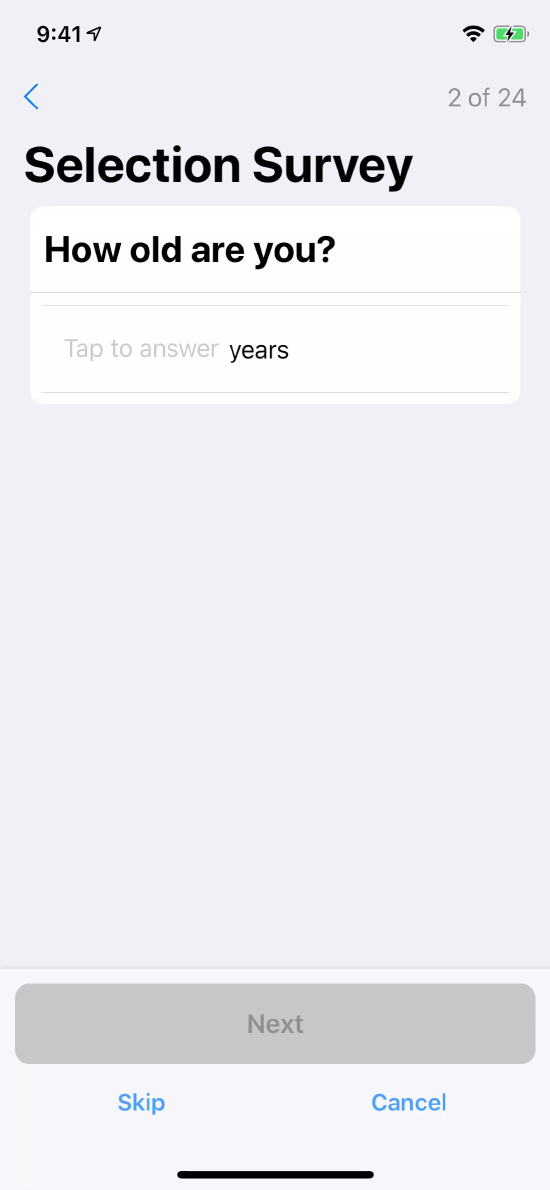
The following code configures a simple numeric question step:
    ORKNumericAnswerFormat *format =
      [ORKNumericAnswerFormat integerAnswerFormatWithUnit:@"years"];
    format.minimum = @(18);
    format.maximum = @(90);
    ORKQuestionStep *step =
      [ORKQuestionStep questionStepWithIdentifier:kIdentifierAge
                                            title:@"How old are you?"
                                           answer:format];
Adding this question step to a task and presenting the task produces a screen that looks like this:
Form Step
When your survey has several related questions, you can use a form step (ORKFormStep) to present them all on one page. Form steps support all the same answer formats as question steps, but can contain multiple items (ORKFormItem), each with its own answer format.
Forms can be organized into sections by incorporating “dummy” form items that contain only a title. See the ORKFormItem reference documentation for more details.
The result of a form step is similar to the result of a question step, except that it contains one question result for each form item. The results are matched to their corresponding form items using their identifiers (the identifier property).
For example, the following code shows how to create a form that requests some basic details, using default values extracted from HealthKit on iOS to accelerate data entry:
    ORKFormStep *step =
    [[ORKFormStep alloc] initWithIdentifier:kFormIdentifier
                                       title:@"Form"
                                        text:@"Form groups multi-entry in one page"];
    NSMutableArray *items = [NSMutableArray new];
    ORKAnswerFormat *genderFormat =
      [ORKHealthKitCharacteristicTypeAnswerFormat
       answerFormatWithCharacteristicType:
         [HKCharacteristicType characteristicTypeForIdentifier:HKCharacteristicTypeIdentifierBiologicalSex]];
    [items addObject:
      [[ORKFormItem alloc] initWithIdentifier:kGenderItemIdentifier
                                         text:@"Gender"
                                 answerFormat:genderFormat];

    // Include a section separator
    [items addObject:
      [[ORKFormItem alloc] initWithSectionTitle:@"Basic Information"]];

    ORKAnswerFormat *bloodTypeFormat =
      [ORKHealthKitCharacteristicTypeAnswerFormat
       answerFormatWithCharacteristicType:
         [HKCharacteristicType characteristicTypeForIdentifier:HKCharacteristicTypeIdentifierBloodType]];
    [items addObject:
      [[ORKFormItem alloc] initWithIdentifier:kBloodTypeItemIdentifier
                                         text:@"Blood Type"
                                 answerFormat:bloodTypeFormat]];

    ORKAnswerFormat *dateOfBirthFormat =
      [ORKHealthKitCharacteristicTypeAnswerFormat
       answerFormatWithCharacteristicType:
         [HKCharacteristicType characteristicTypeForIdentifier:HKCharacteristicTypeIdentifierDateOfBirth]];
    ORKFormItem *dateOfBirthItem =
      [[ORKFormItem alloc] initWithIdentifier:kDateOfBirthItemIdentifier
                                         text:@"DOB"
                                 answerFormat:dateOfBirthFormat]];
    dateOfBirthItem.placeholder = @"DOB";
    dateOfBirthItem.optional = YES;
    [items addObject:dateOfBirthItem];

    // ... And so on, adding additional items
    step.formItems = items;
The code above creates this form step:
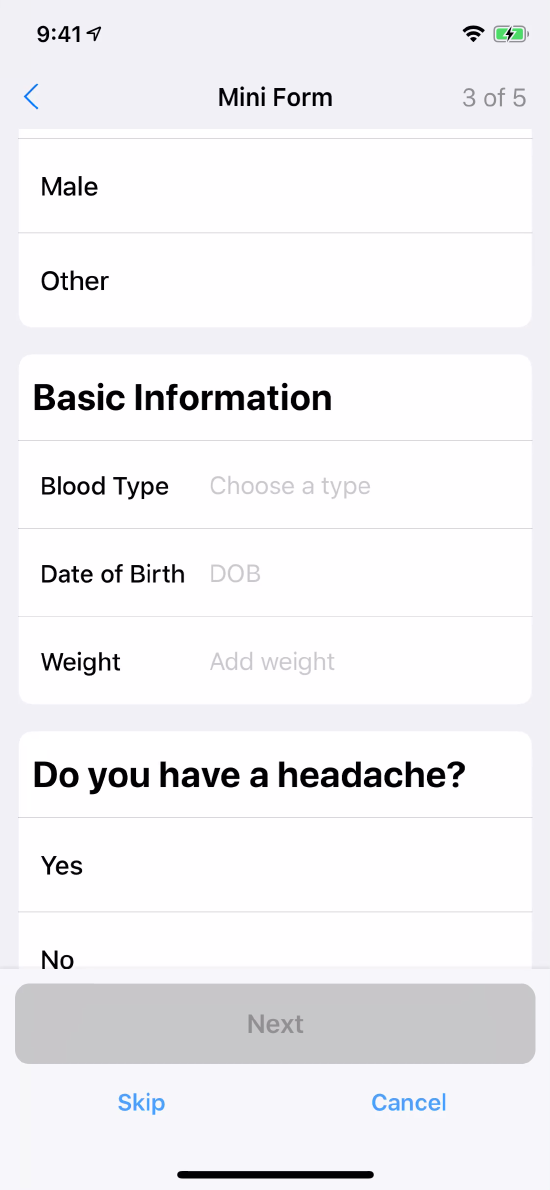
The ORKFormItem has a boolean property named optional which affects navigation to subsequent steps. It is set to NO by default, which requires the user to set that item before they can continue. If the property is set to YES, then the user can continue to the next step without setting the item. In the above code snippet, the optional property is for the dateOfBirth object is set to YES. This lets the user continue to the next step without entering their date of birth.
Answer Formats
In the ResearchKit™ framework, an answer format defines how the user should be asked to answer a question or an item in a form. For example, consider a survey question such as “On a scale of 1 to 10, how much pain do you feel?” The answer format for this question would naturally be a discrete scale on that range, so you can use scale answer format (ORKScaleAnswerFormat), and set its minimum and maximum properties to reflect the desired range.
The screenshots below show the standard answer formats that the ResearchKit framework provides.
 Scale answer format
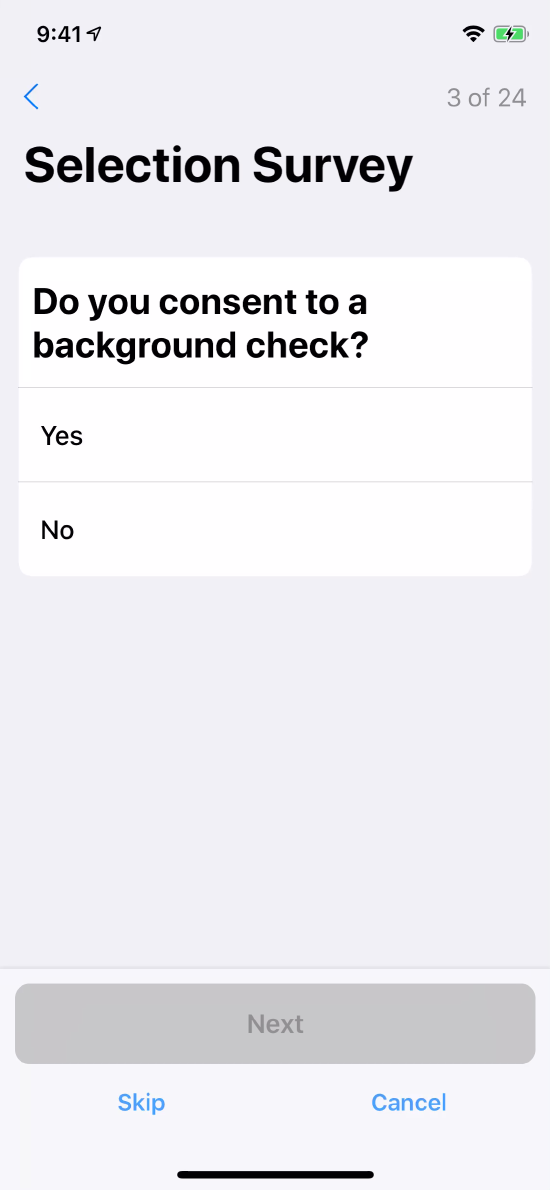 Boolean answer format
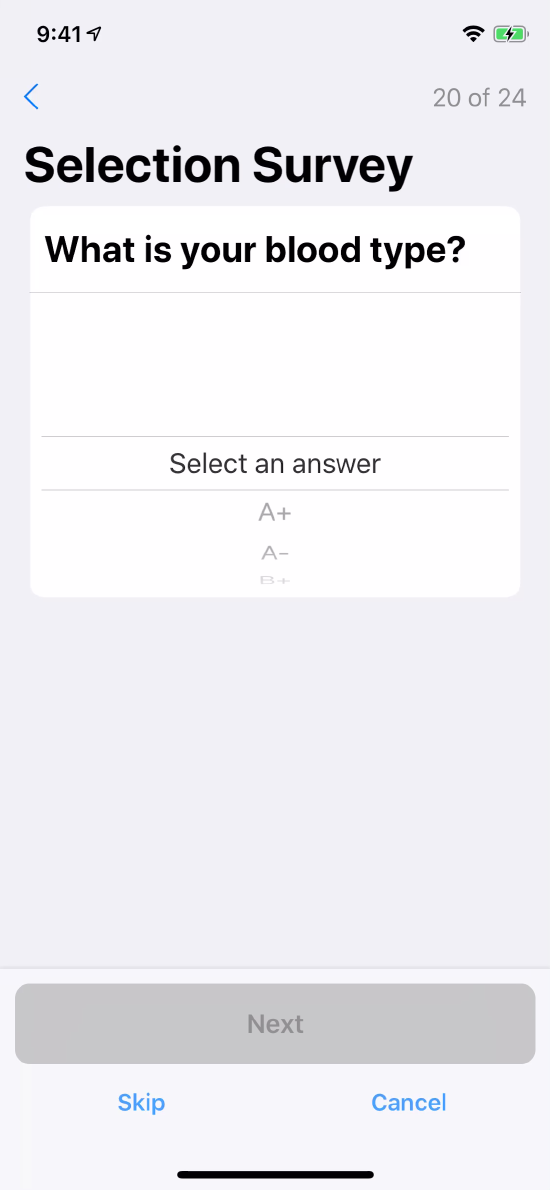 Value picker answer format
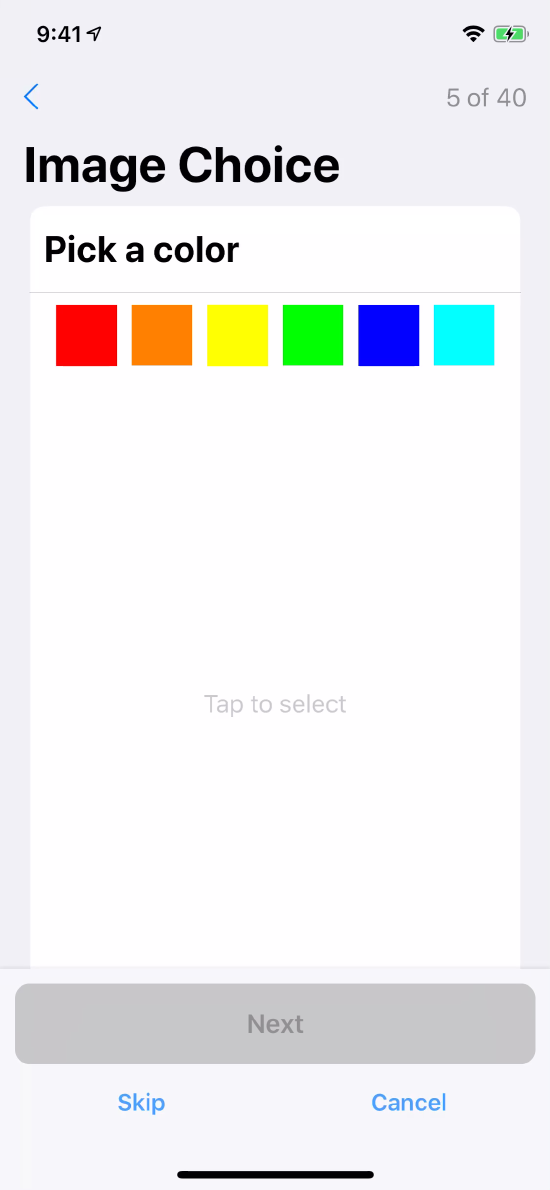 Image choice answer format
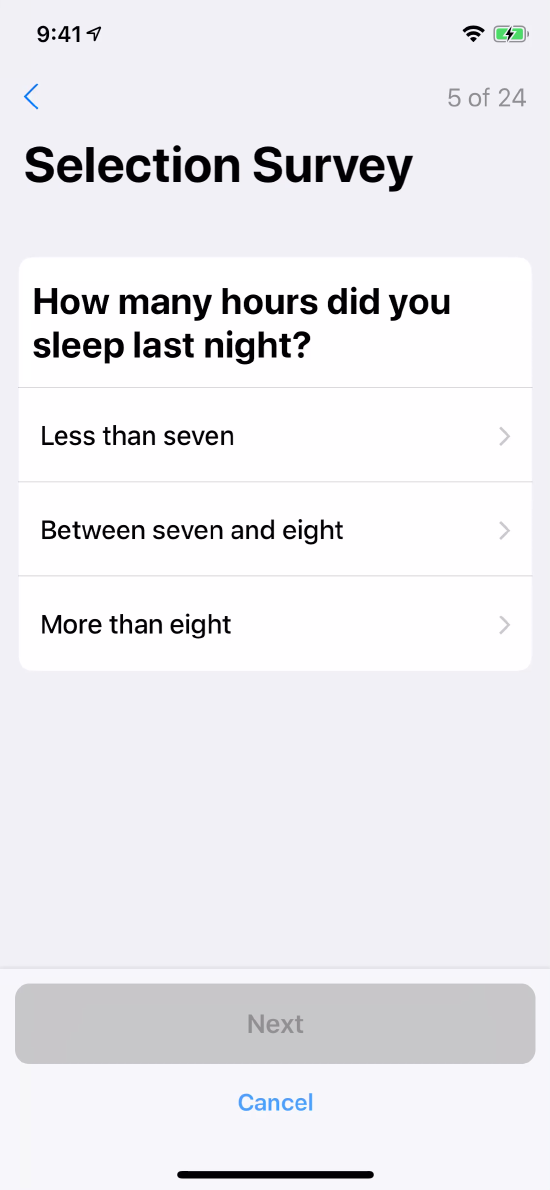 Text choice answer format (single text choice answer)
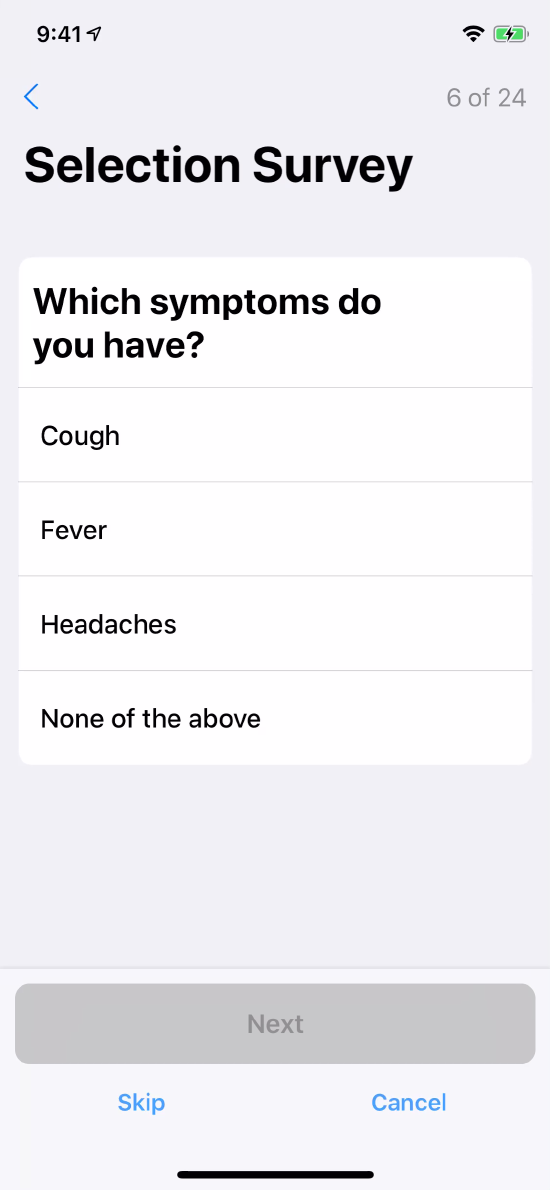 Text choice answer format (multiple text choice answer)
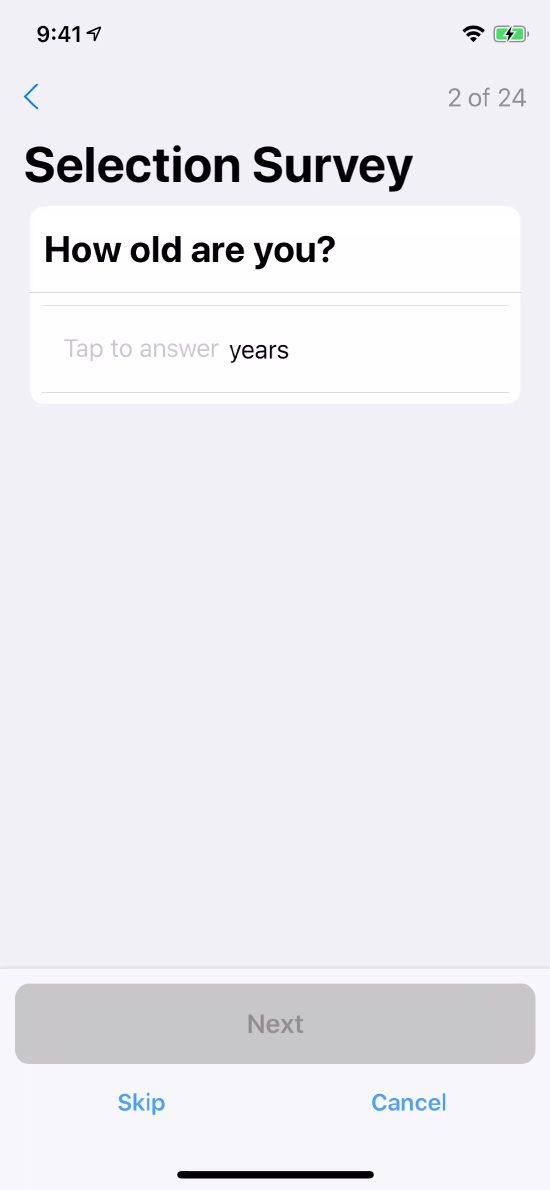 Numeric answer format
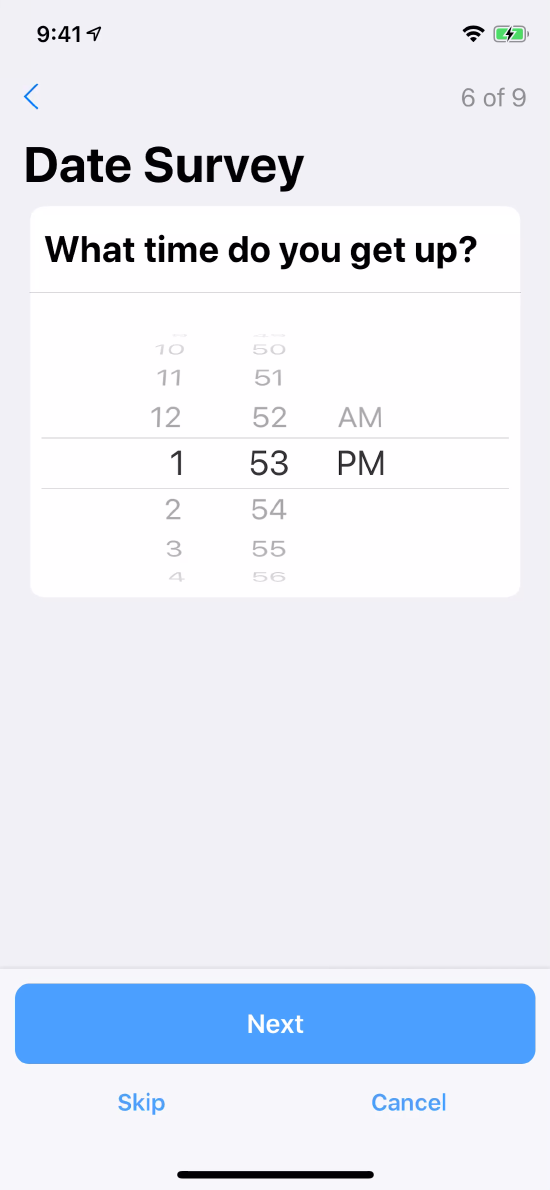 TimeOfTheDay answer format
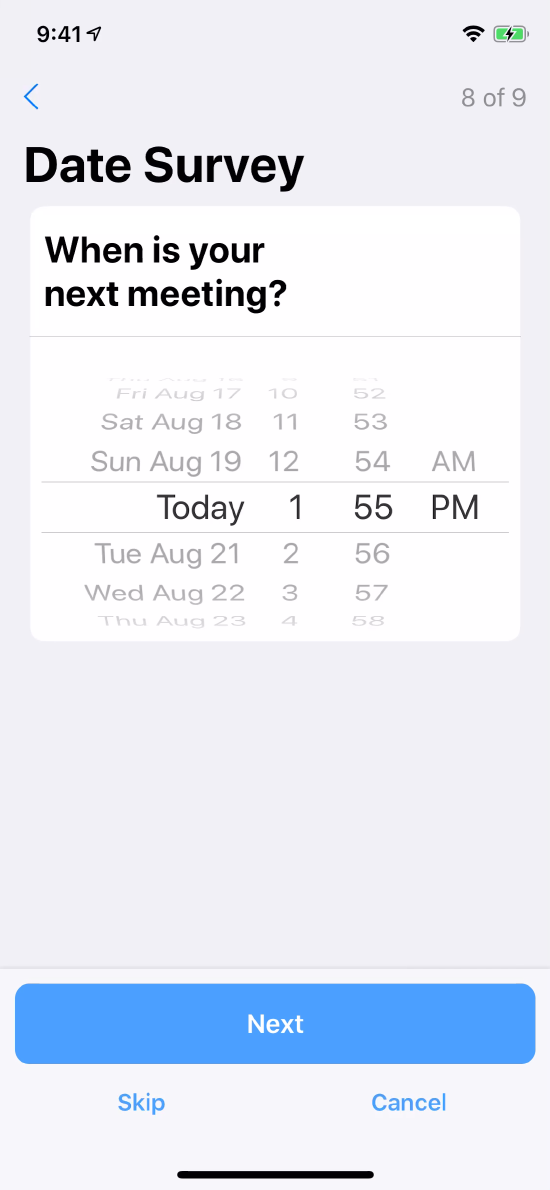 Date answer format
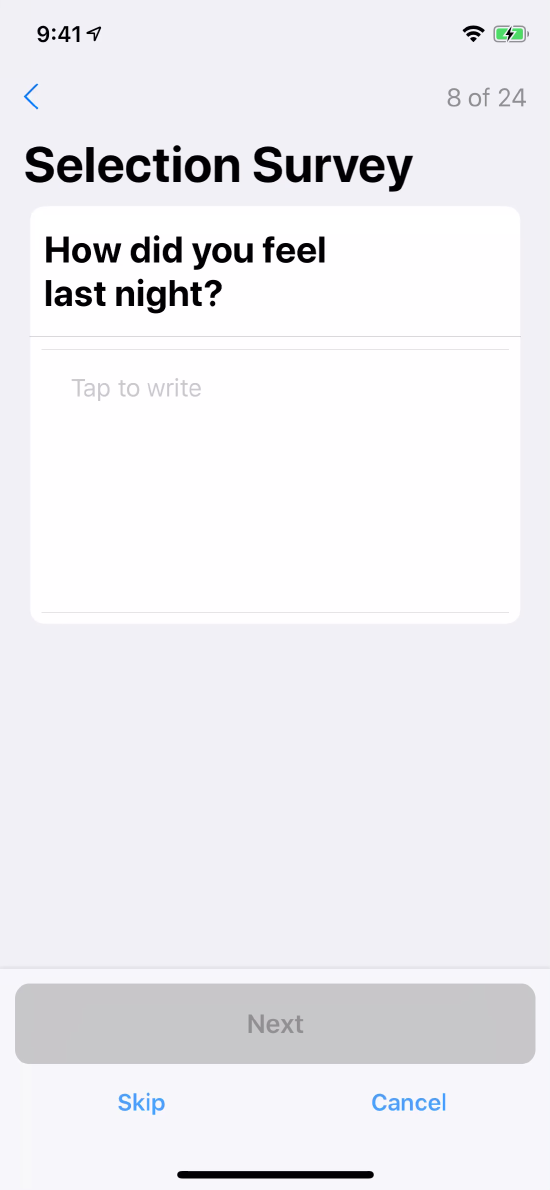 Text answer format (unlimited text entry)
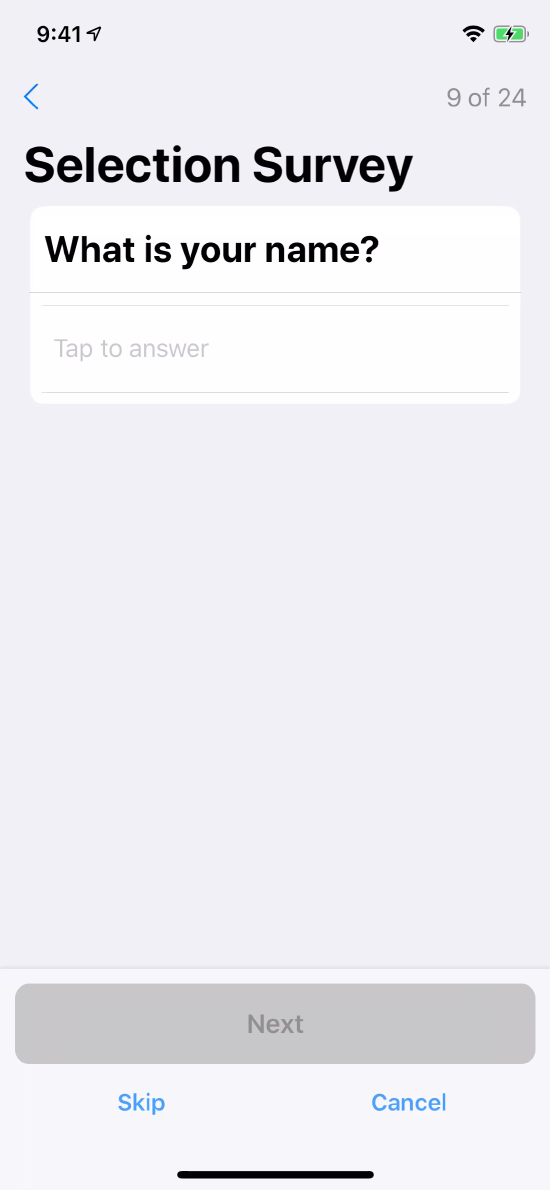 Text answer format (limited text entry)
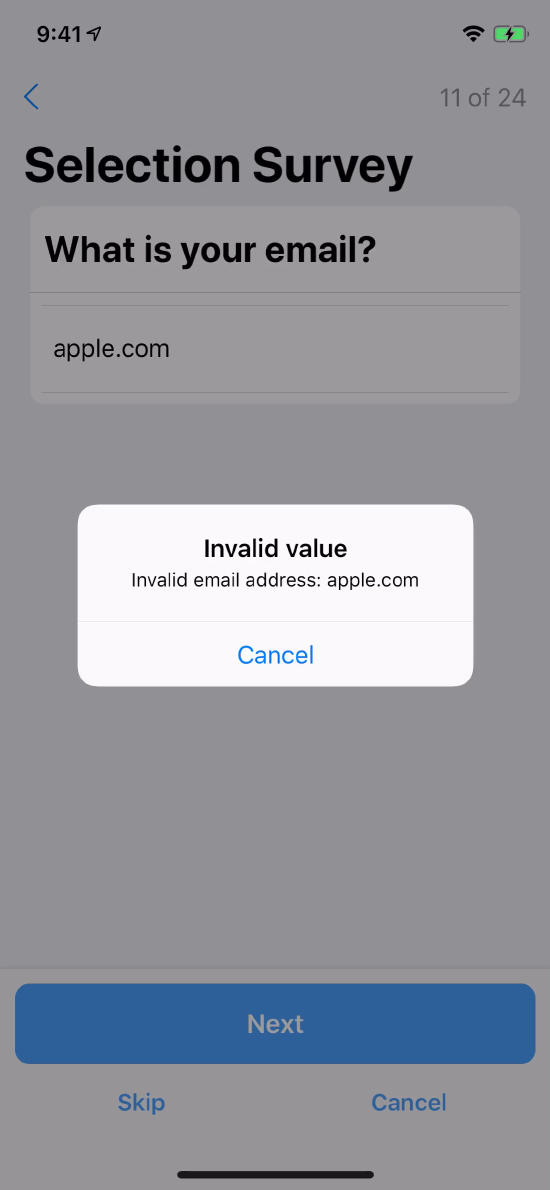 Validated text answer format
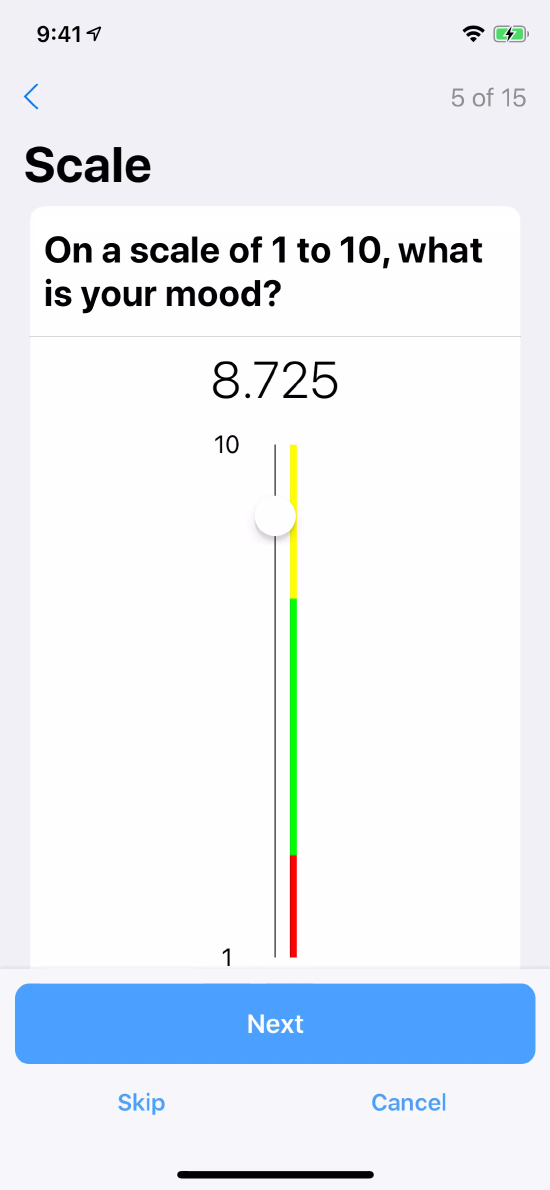 Scale answer format (vertical)
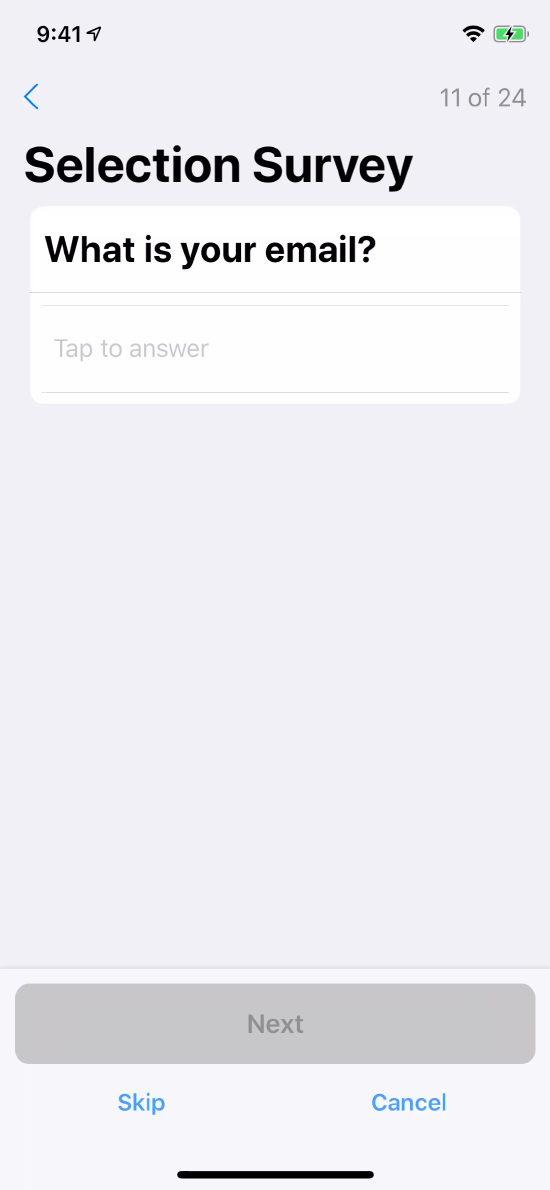 Email answer format
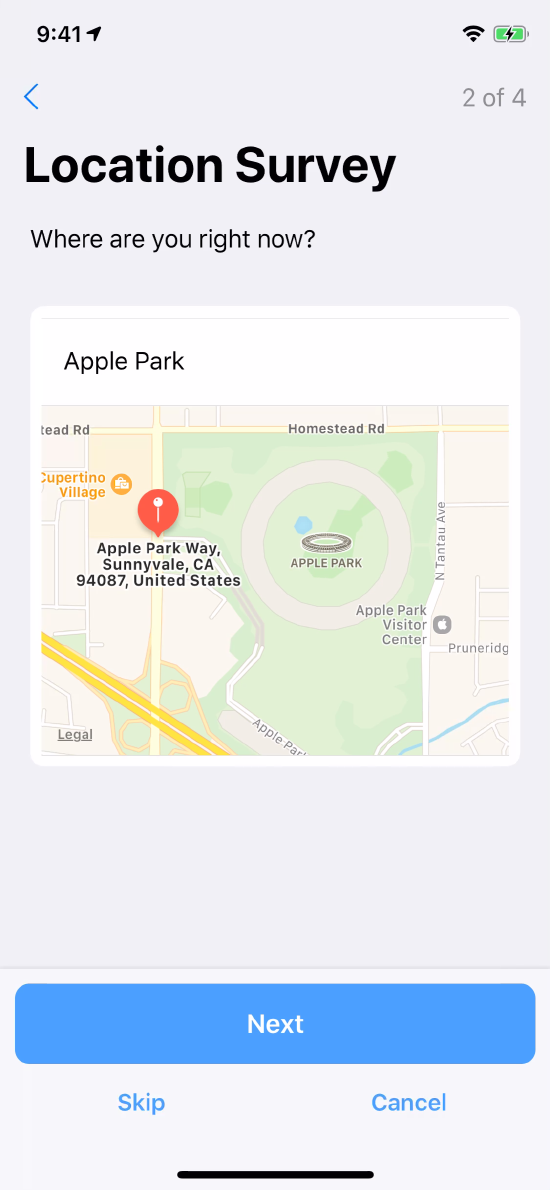 Location answer format
In addition to the preceding answer formats, the ResearchKit framework provides special answer formats for asking questions about quantities or characteristics that the user might already have stored in the Health app. When a HealthKit answer format is used, the task view controller automatically presents a Health data access request to the user (if they have not already granted access to your app). The presentation details are populated automatically, and, if the user has granted access, the field defaults to the current value retrieved from their Health database.
2. Create a Survey Task
Once you create one or more steps, create an ORKOrderedTask object to
contain the steps. The code below shows a Boolean step being added to a task.
    // Create a Boolean step to include in the task.
    ORKStep *booleanStep =
      [[ORKQuestionStep alloc] initWithIdentifier:kNutritionIdentifier];
    booleanStep.title = @"Do you take nutritional supplements?";
    booleanStep.answerFormat = [ORKBooleanAnswerFormat new];
    booleanStep.optional = NO;
    // Create a task wrapping the boolean step.
    ORKOrderedTask *task =
      [[ORKOrderedTask alloc] initWithIdentifier:kTaskIdentifier
                                           steps:@[booleanStep]];
You must assign a string identifier to each step. The step identifier must be unique within the task, because it is the key that connects a step in the task hierarchy with the step result in the result hierarchy.
To present the task, attach it to a task view controller and present it. The code below shows how to create a task view controller and present it modally.
    // Create a task view controller using the task and set a delegate.
    ORKTaskViewController *taskViewController =
      [[ORKTaskViewController alloc] initWithTask:task taskRunUUID:nil];
    taskViewController.delegate = self;

    // Present the task view controller.
    [self presentViewController:taskViewController animated:YES completion:nil];
Note: ORKOrderedTask assumes that you will always present all the questions,
and will never decide what question to show based on previous answers.
To introduce conditional logic, you must either subclass
ORKOrderedTask or implement the ORKTask protocol yourself.
3. Collect Results
The result property of the task view controller gives you the results of the task. Each step view controller that the user views produces a step result (ORKStepResult). The task view controller collates these results as the user navigates through the task, in order to produce an ORKTaskResult.
Both the task result and step result are collection results, in that they can contain other result objects. For example, a task result contains an array of step results.
The results contained in a step result vary depending on the type of step. For example, a question step produces a question result (ORKQuestionResult); a form step produces one question result for every form item; and an active task with recorders generally produces one result for each recorder.
The hierarchy of results corresponds closely to the input model hierarchy of task and steps, as you can see here:
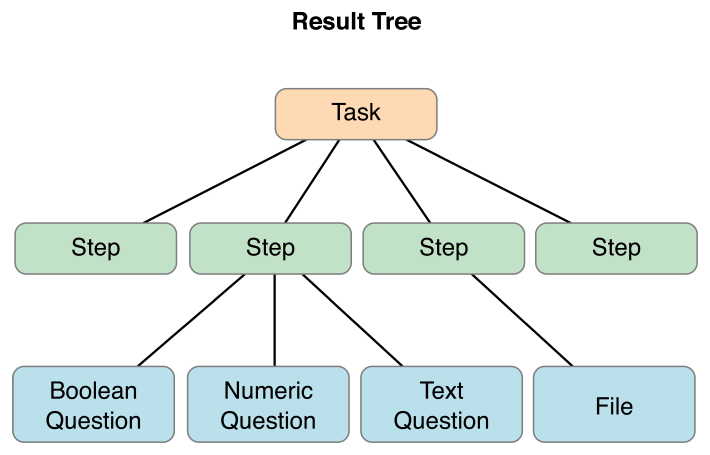
Among other properties, every result has an identifier. This identifier is what connects the result to the model object (task, step, form item, or recorder) that produced it. Every result also includes start and end times, using the startDate and endDate properties respectively. These properties can be used to infer how long the user spent on the step.
Conditional Steps
Sometimes it’s important to know the result of a step before presenting the next step. For example, suppose a step asks “Do you have a fever?” If the user answers Yes, the next question the next question might be “What is your temperature now?”; otherwise it might be, “Do you have any additional health concerns?”
To add custom conditional behavior in your task, use either ordered task (ORKOrderedTask) or navigable ordered task (ORKNavigableOrderedTask), and override particular ORKTask methods like stepAfterStep:withResult, and stepBeforeStep:withResult: and call super for all other methods.
Ordered Tasks
A sequential (static) task, such as a survey or an active task, can be represented as an ordered task.
The following example demonstrates how to subclass
ORKOrderedTask to provide a different set of steps depending on the
user’s answer to a Boolean question. Although the code shows the step-after-step method, a corresponding implementation of “step-before-step”
is usually necessary.
    - (ORKStep *)stepAfterStep:(ORKStep *)step
                    withResult:(idORKTaskResultSource)result {
        NSString *identifier = step.identifier;
        if ([identifier isEqualToString:self.qualificationStep.identifier])
        {
            ORKStepResult *stepResult = [result stepResultForStepIdentifier:identifier];
            ORKQuestionResult *result = (ORKQuestionResult *)stepResult.firstResult;
            if ([result isKindOfClass:[ORKBooleanQuestionResult class]])
            {
                ORKBooleanQuestionResult *booleanResult = result;
                NSNumber *booleanAnswer = booleanResult.booleanAnswer;
                if (booleanAnswer)
                {
                    return booleanAnswer.boolValue ? self.regularQuestionStep : self.terminationStep;
                }
            }
        }
        return [super stepAfterStep:step withResult:result];
    }
Navigable Ordered Task
The navigable ordered task (ORKNavigableOrderedTask) inherits its behavior from the ordered task (ORKOrderedTask) class. In addition to inheriting the behavior of ordered task it provides functionality to present different set of steps depending on the user’s answer to a question.
You can add a condition while the user navigates through the steps in a task by adding a conditional step navigation. For example, add a navigation rule to obtain a new destination step when the user goes forward from one step to another. You cannot add more than one navigation rule to the same step. If you do, then the most recent rule is executed.
For example, to display a survey question only when the user answered Yes to a previous question you can use ORKPredicateStepNavigationRule; or if you want to define an arbitrary jump between two steps, you can use ORKDirectStepNavigationRule.
The following example demonstrates how you can add a navigation rule to go to different step in the task depending on the user’s selection to the symptom type. For example, from the “symptom” step, go to “other_symptom” step when the user didn’t chose headache. Otherwise, default to going to next step (the regular ordered task (ORKOrderedTask) applies).
    ORKNavigableOrderedTask *task = [[ORKNavigableOrderedTask alloc] initWithIdentifier:StepNavigationTaskIdentifier steps:steps];


    // Build a navigation rule
    ORKPredicateStepNavigationRule *predicateRule = nil;

    NSPredicate *predicateHeadache = [ORKResultPredicate predicateForChoiceQuestionResultWithResultIdentifier:@"symptom" expectedString:@"headache"];


    // The user didn't choose headache at the symptom step
    NSPredicate *predicateNotHeadache = [NSCompoundPredicate notPredicateWithSubpredicate:predicateHeadache];

    predicateRule = [[ORKPredicateStepNavigationRule alloc] initWithResultPredicates:@[ predicateNotHeadache ]
                                                          destinationStepIdentifiers:@[ @"other_symptom" ] ];

    [task setNavigationRule:predicateRule forTriggerStepIdentifier:@"symptom"];
Saving Results on Task Completion
After a task is completed, you can save or upload the results. This approach
will likely include serializing the result hierarchy in some form,
either using the built-in NSSecureCoding support, or another
format appropriate for your application.
If your task can produce file output, the files are generally referenced by an ORKFileResult object and they are placed in the output directory that you set on the task view controller. After you complete a task, one implementation might be to serialize the result hierarchy into the output directory, zip up the entire output
directory, and share it.
In the following example, the result is archived with
NSKeyedArchiver on successful completion. If you choose to support
saving and restoring tasks, the user may save the task, so this
example also demonstrates how to obtain the restoration data that
would later be needed to restore the task.
    - (void)taskViewController:(ORKTaskViewController *)taskViewController
           didFinishWithReason:(ORKTaskViewControllerFinishReason)reason
                         error:(NSError *)error
    {
        switch (reason) {
        case ORKTaskViewControllerFinishReasonCompleted:
            // Archive the result object first
            NSData *data = [NSKeyedArchiver archivedDataWithRootObject:taskViewController.result];

            // Save the data to disk with file protection
            // or upload to a remote server securely.

            // If any file results are expected, also zip up the outputDirectory.
            break;
        case ORKTaskViewControllerFinishReasonFailed:
        case ORKTaskViewControllerFinishReasonDiscarded:
            // Generally, discard the result.
            // Consider clearing the contents of the output directory.
            break;
        case ORKTaskViewControllerFinishReasonSaved:
            NSData *data = [taskViewController restorationData];
            // Store the restoration data persistently for later use.
            // Normally, keep the output directory for when you will restore.
            break;
        }
    }