These materials are for informational purposes only and do not constitute legal advice. You should contact an attorney to obtain advice with respect to the development of a research app and any applicable laws.
Passcode
ResearchKit apps often hold sensitive user data. In order to protect that data, your app can use Apple’s Passcode technology from within ResearchKit. With Passcode, your users can provide a four or six-digit user-selected code for access or use their fingerprint via Touch ID on devices that provide that feature.
Supporting Passcode in your app involves several operations:
- Creation, during which the user enters their desired passcode twice—once to establish it and a second time to confirm it.
- Access, when the app requests the four-digit passcode or Touch ID after the passcode is created.
- Edit, in case the user wants to change the passcode.
- Remove, in case the user no longer wants a passcode.
The user’s keychain on the device stores the passcode.
Create a Passcode
The creation of a passcode starts with the creation of an ORKPasscodeStep object. The ORKPasscodeStep class inherits from the ORKStep class and provides step functionality that is common in ResearchKit.
This code demonstrates how to create a passcode step using a four-digit passcode.
First, create the step object:
ORKPasscodeStep *passcodeStep = [[ORKPasscodeStep alloc] init];
Next, set the passcode type. Here, a four-digit passcode is used:
passcodeStep.passcodeType = ORKPasscodeType4Digit;
For additional security, consider using a six-digit passcode:
passcodeStep.passcodeType = ORKPasscodeType6Digit;
After the step is created, create an ORKOrderedTask object. Pass a string identifier as the first parameter, and the newly created passcode step (along with any additional steps for your app) into an array as the second parameter:
ORKOrderedTask *task = [[ORKOrderedTask alloc] initWithIdentifier:@"passcodeTask" steps:@[passcodeStep]];
Pass the newly created task to an ORKTaskViewController object and set the view controller’s delegate:
ORKTaskViewController *taskViewController = [[ORKTaskViewController alloc] initWithTask:task  taskRunUUID:nil];
taskViewController.delegate = self
Finally, present the task view controller:
[self presentViewController:taskViewController animated:TRUE completion:nil];
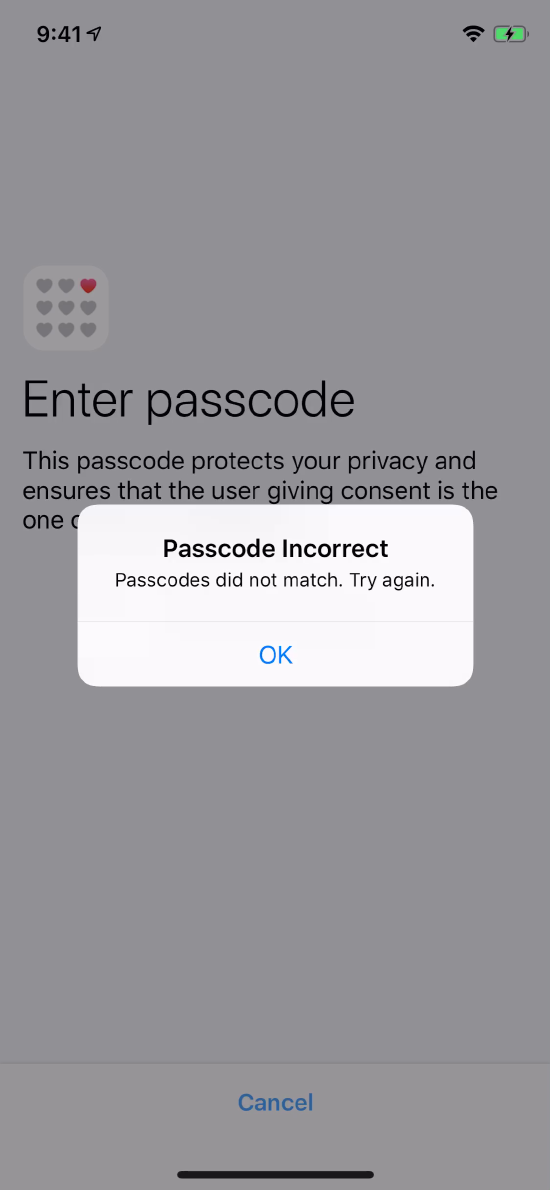
The user is instructed to type in a passcode twice—once for the initial passcode, and again to confirm it. Figure 1 shows the initial view.

If the confirmation fails, an alert appears indicating a mismatch. The user can then type the passcode again, as shown in Figure 2.
Upon a successful match, the step alerts the user that it has saved the passcode. The device’s keychain stores the passcode.
Use the Passcode to Protect Content
With the passcode set, you can protect sensitive data in your app by enforcing user confirmation. The ORKPasscodeViewController class is responsible for displaying the view that requires the user to enter their passcode before proceeding. Note that a passcode must be set prior to enforcement, or an exception occurs.
To enforce passcode entry, use the following class method:
ORKPasscodeViewController * passcodeViewController;

if ([ORKPasscodeViewController isPasscodeStoredInKeychain] == YES) {
    self.passcodeViewController = [ORKPasscodeViewController passcodeAuthenticationViewControllerWithText:@"Upon success, you'll go to the next step." delegate:self];
    // present the view
} else {
}
Your class must adhere to the ORKPasscodeDelegate protocol in order to know whether the passcode was entered correctly or not, or if the user canceled.
When the view is presented, the user is prompted to enter their four or six-digit passcode, as shown in Figure 3.

The following method is called if the passcode was successfully entered:
- (void)passcodeViewControllerDidFinishWithSuccess:(UIViewController *)viewController;
You should perform any steps that would follow a successful authentication at this point.
If the user does not input the passcode correctly, the following method is called:
- (void)passcodeViewControllerDidFailAuthentication:(UIViewController *)viewController;
The passcodeViewControllerDidFailAuthentication method gives your app the opportunity to attempt a reauthentication or rejection of additional steps going forward.
If you want to provide a Cancel button so that the user has the option to back out of the authentication process, implement the following method:
- (void)passcodeViewControllerDidCancel:(UIViewController *)viewController;
The passcodeViewControllerDidCancel method is also called if the user taps the Cancel button.
Edit an Existing Passcode
Provide users the ability to conveniently edit their passcode by using the following code:
ORKPasscodeViewController *passcodeViewController;

if ([ORKPasscodeViewController isPasscodeStoredInKeychain] == YES) {
    self.passcodeViewController = [ORKPasscodeViewController passcodeEditingViewControllerWithText:@"Choose something unique." delegate:self passcodeType:OKPasscodeType4Digit];
    // present the view
} else {
}
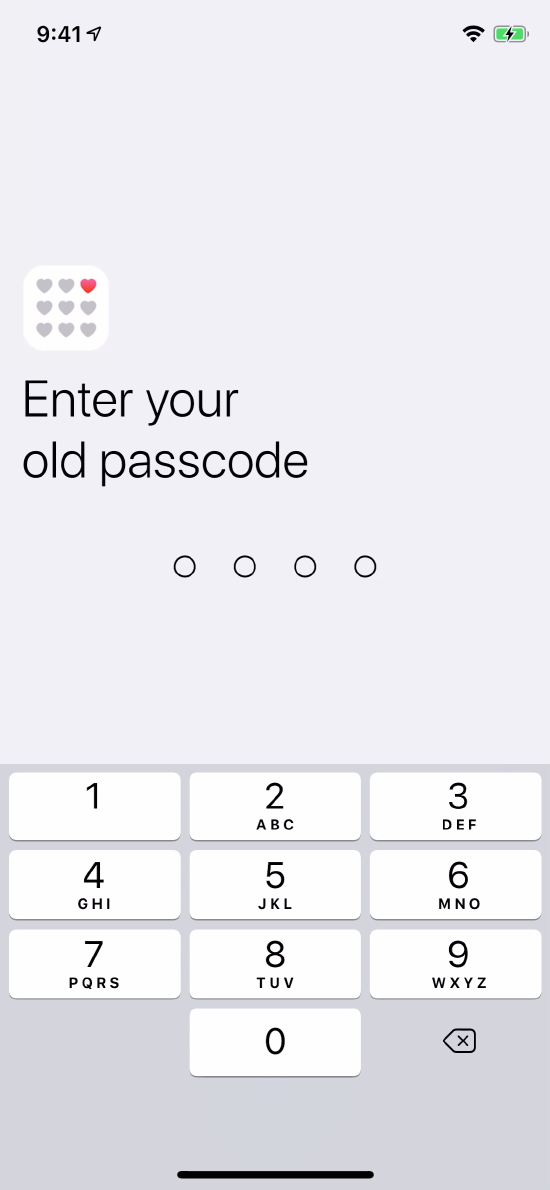
When the editing view controller appears, the user is prompted to enter their old passcode, as shown in Figure 4.
If it is entered correctly, the user has the opportunity to enter a new passcode of the specified type and should enter it again to verify it.
Note that the passcode type (four or six-digit) is passed as the last parameter to the method, allowing the user’s new passcode to be of a different type than their current one.
Remove an Existing Passcode
At times it is necessary to know if the user has already created a passcode. The following class method on the ORKPasscodeViewController class returns YES or NO to indicate whether or not a passcode exists:
+ (BOOL)isPasscodeStoredInKeychain;
You can remove the user’s passcode from the keychain with the following class method on the ORKPasscodeViewController class:
+ (BOOL)removePasscodeFromKeychain;
The value YES is returned if the passcode was successfully removed from the keychain.